I’ve always loved looking at photos of other people’s studios. I find them fascinating! I love seeing what creative people surround themselves with when they’re most in need of inspiration. I love seeing what creative storage and display solutions they come up with. Now I’m so happy to share mine as well!
As I mentioned in my last post, I’m perhaps most excited because the entire room was put together with things I already had – with only one small exception. I hope that will inspire others who need to make do with what they have not to let that keep them from doing what they can, the way I procrastinated my own little makeover. There are no before pictures, because I always think of that after I’m finished. So close your eyes and imagine with me an unpleasant little room with dirty white walls, childhood scribbles, a sad old wallpaper border, and piles of stuff everywhere. And then open your eyes. . .
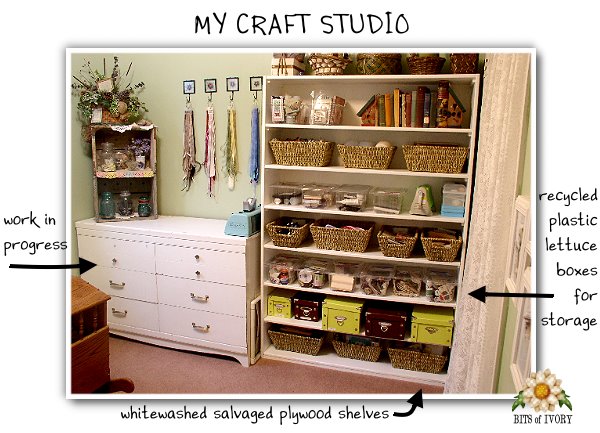
Oh, a place for everything, and everything in its place, just as Grandma always suggested! The newly whitewashed shelves were raw plywood, snatched from the fruit room when it was dismantled a few years ago. Now they’re functional and pretty. The baskets were purchased on clearance years and years ago, and fit the shelves perfectly. You can also see in this photo the storage solution I mentioned some time ago – recycled plastic boxes that lettuce comes in! They’re perfect for storing bits and pieces, and it’s nice to be able to see what’s inside without opening them all up.
The fresh green color on the walls is leftover paint from another room. The dresser/cutting table is a work in progress. I nearly repainted it to match the shelves, but I like the distressed look, and so will someday replace the hardware on it and distress it to match. For now it’s shabby, but in its heart it’s shabby chic. The two old wooden boxes on top were salvaged from my grandfather’s attic and make perfect shelves for the button jars. The jars are from my mother-in-law and grandmother, and most of the buttons in the jars are also from Grandma’s collection.
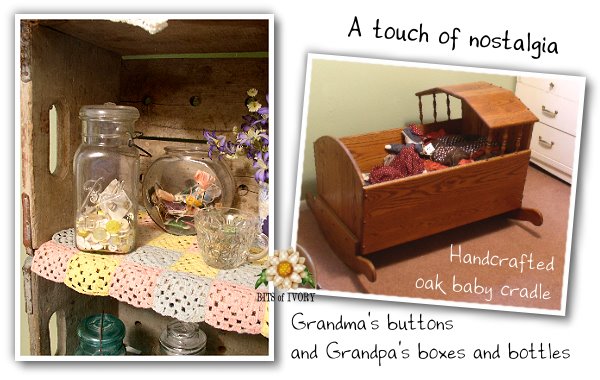
The baby cradle is a bit of an unusual choice for a studio, I know. It was made for us by my husband’s father when our first baby was born, and I adore it. It’s so very beautiful and I can’t bear to stuff it away in storage somewhere. There’s really no other place for it in the house, and so I keep it in my little room. Oh, and isn’t the little “doily” on those shelves sweet? My grandmother crocheted it as a doll blanket long, long ago. I’m nostalgic at heart, and it’s definitely reflected in my artwork, so it only makes sense to surround myself with well loved, well worn things that remind me of the people and the moments in life that I most cherish.
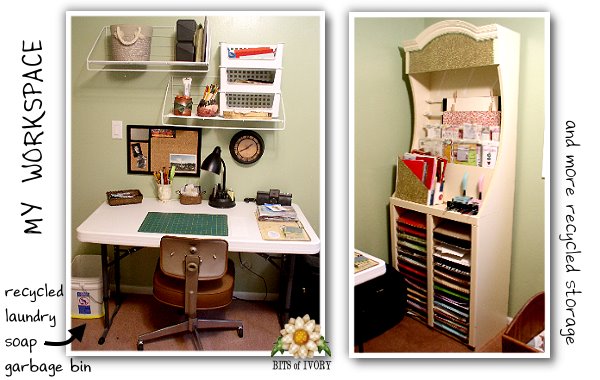
My workspace is also a work in progress. Someday it will be beautiful, but for now it is incredibly practical. Another nod to nostalgia is the red and black pencil holder on the shelf above my table. . . made for me in ceramics class by my son. Another son’s artwork hangs with my children’s photos on the little wall by the closet, and soon I’ll have something made especially for the studio by my daughter. Note the wastepaper bucket – a recycled laundry detergent bucket which will someday be covered in pretty paper, but for now does it’s job perfectly anyway. All garbage bins should have handles! The little paper display shelf on the right was purchased at a thrift shop several years ago. My very small son noticed it and dragged me over to it, and when I saw the $10.00 price tag I just couldn’t resist. Old, used Priority Mail boxes hold the large scraps of paper, and stickers and very large format paper hang above. I covered up the brand name of the display case with some pretty patterned paper and ribbon.
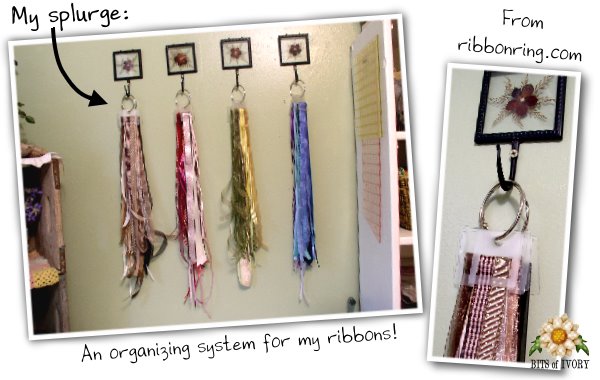
And now for my splurge. The only money I spent on this makeover. . . a ribbon organizer. I’ve tried so many things to keep the ribbon neat and easily accessible, and nothing has worked for me. I was planning to try a tip I had read on the internet, cutting a raingutter to size! I still like that idea, but I needed something much more portable since the room is too small for our card nights. These ribbon organizers can easily be brought upstairs for card night, and then hung back on their hooks (beautiful hooks purchased for $1.00 each on clearance at Pier 1 many years ago, intended for gifts but sadly forgotten in a drawer until now). No more tangles! I call them a splurge because they were my only purchase. . . but really they’re very inexpensive. A starter kit is only $8.00 at www.ribbonring.com. I spent just a bit more to get a package of bigger ones as well, but there was plenty in the starter kit for what you see here, and then some.
I hope that was fun, and inspired ideas for your own workspace, and I’d love to hear your ideas and solutions as well.

